Glitter Royal Blue Nails + How To: Remove Glitters

Hello Nail Art Lovers!

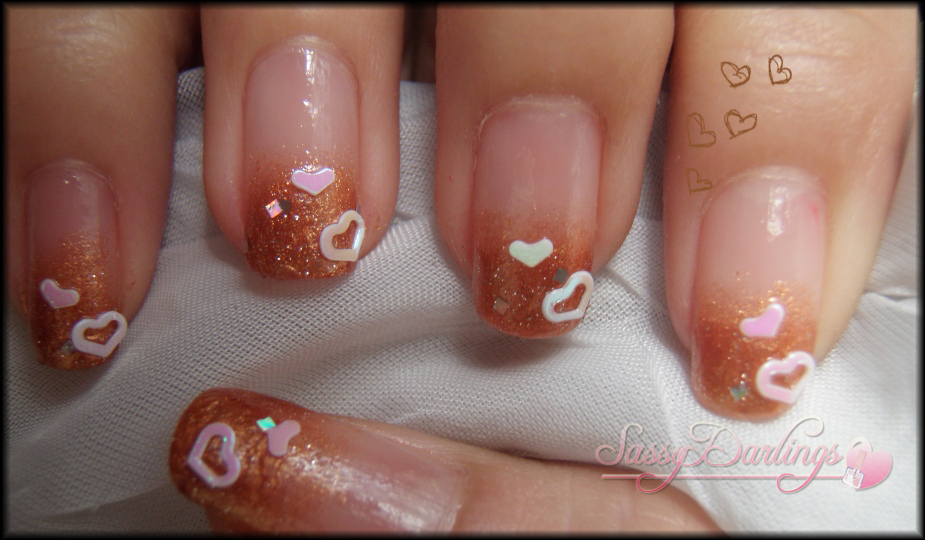
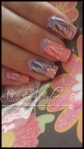
I’ve been invited to a wedding last month with a royal blue theme. Everyone’s requested to wear something that has a touch of royal blue. I was excited since I have couple of royal blue nail polishes. I want to wear something simple and matches the bold royal blue color so I came up with a glitter gradient effect. Simplicity is beauty.

Ombre nails is a summer trend that I don’t think would die out soon. Ombre nails are created through the gradient effect which can be done in two ways.  The first one is by sponge method where you dipped the sponge in the polish of your choice and slowly dub it on top of the existing polish on your nails of different color. The second one is simply using the nail art brush, gradually minimizing the area as you put in another coat. It’s doing the half of your nails, then 1/4th of your nails.

I’ll also be teaching or encouraging you rather to utilize the foil method in taking off glitters. Nothing is harder when it comes to nail art than removing hard-to-get glitters. Removing it with a regular nail polish remover might take you forever especially if it’s acetone free.

What is an acetone?

                Acetone is a clear, harsh-smelling and highly flammable liquid. It’s a solvent, capable of disintegrating even plastic. This explains why it works so quickly breaking apart and removing your nail polish. Isopropyl alcohol is typically used in the making of acetone. – more here

Nail Polish with acetone is stronger in chemicals and easily gets off the polishes on your nails. Non-acetone is an acid free nail polish remover. It is a safer acid free alternative than acetone to remove nail polish while being gentler on the cuticle. There’s no negative effect on nails if you’re going to use pure acetone. Using non-acetone takes a lot more time than using the pure-acetone.

Personally, I only use Pure-acetone nail polish removers. I’ve tried the non-acetone one and it barely takes off the polish on my nails without doing it a few more times. Plus, it’s time consuming and wastes a lot of cottons. A pure acetone nail polish remover takes off polish easily but when it comes to glitters it loses its purpose. When I used the Foil method, I realized how hassle free it is. I’ll just have to wait around 5 mins. and the glitters are gone!

sassydarlings

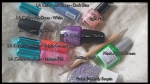
Products Used: Etude House Dear Darling Nails WH020 II The Face Shop BL607 II Etude House Wannabe Perfumed Syrup Nails-Sparkling Silver II Caronia
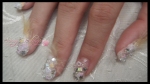
Glitter Royal Blue

Glitter Royal Blue


Foil Method in Removing Glitters on Your Nails

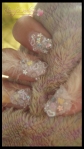
Materials: Scissors, acetone, cotton, aluminum foil

Step 1: Cut 10 pieces of square sized aluminum foil that fits your entire nails.

Step 2: Soak the cotton in acetone and place it on top of your whole nails. Ensure that all sides are covered.

Step 3: Wrap the foil around your finger with the cotton still on top of your nails. Wait for 5 mins and remove it. (tighten foil wrapped around your fingers so the glitters would stick on the cotton)

Step 4: Wash your nails, then moisturize. Acetone dries out your nails so you need to moisturize it.

                In case there are still glitters left, I just rub them off with the remover. 98% of the glitters stick to the cotton so you need to clean it again. This method is not the quickest way but surely is the easiest way!
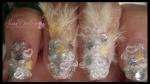
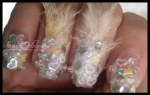
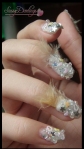
sassydarlings

Foil Method

sassydarlingsroyal blue nail artroyal blue nail artroyal blue nail artroyal blue nail art

royal blue nail art

DOWNLOAD HERE

Password: sassydarlings

SUBSCRIBE TO ME ON YOUTUBE  -watch my other nail art video tutorials-

FOLLOW ME ON TWITTER  -know what I’m doing-

ASK ME ON FORMSPRING  -I’ll gladly answer your questions-

LIKE ME ON FACEBOOK -spread the beauty of nail art-

PINTEREST – my everyday inspirations

My Graduation Nails (Green and Yellow)

Hello everyone!

I’d like to share the nail art design I had when I graduated in College (Hotel and Restaurant Management) last March 2011.  My University’s primary colors are yellow and green. Basically, you can see yellow and green everywhere! and especially on school’s merchandise i.e. notebooks, ballpens, etc.  This is my alma mater, since kindergarten I haven’t been transferred to any school so I don’t have any idea what’s it like wearing another uniform.  Finally, I’ve reached the final stage of schooling and now it’s time to work!

Hope you’ll love this design! Thanks for watching! Have a great summer!

materials

materials


My Graduation Nails

My Graduation Nails


My Graduation Nails

My Graduation Nails

SUBSCRIBE TO ME ON YOUTUBE

-watch my other nail art video tutorials-

FOLLOW ME ON TWITTER

-know what i’m doing-

ASK ME ON FORMSPRING

-I’ll gladly answer your questions-

LIKE ME ON FACEBOOK

-spread the beauty of nail art-

click for more photos:

Continue reading

Witch’s Hat nail Art for Halloween!

Hello everyone!

Currently I’m uploading Halloween inspired Nail Arts since Halloween is just around the corner^_^ I love doing French manicures on my nails so I can’t miss making a french manicure design for halloween! Here’s a simple, easy (almost-witch-hat-look) nails for ya!^_^ Happy Halloween!

Products

Witch's Hat

Witch's Hat

Click for more pictures and Download:

Continue reading

Purple Glamour Nail Art

Another design I made last week! Purple Glamour Nail Art that uses the ‘Sponge Technique’ that creates a gradient or fading effect on nails. I like this effect better than a plain line and i always want to try it with a simple french manicure.

In using sponge, you can either use a sponge for make-up or a sponge tip applicator which can be bought anywhere.

By the way, after I apply the topcoat, the hollow stars faded and it kinda ruined the design on the nail. (see my right ring finger, it’s quite messed up).

Hope y’all like it!

Products:

L.A. Colors Color Craze in Purple

L.A. Colors Art Deco – Silver GLitter

L.A. Colors Art Deco – white

L. A. Colors Metallic Silver

Sponge

toothpick

Purple Hollow Stars

Products

Products

Purple Glamour Nail Art

Purple Glamour Nail Art

Click for more pictures and Download:

Continue reading

“Nail Art Through The Ages” – 1990’s

A huge collaboration hosted by Dollface together with the nail art gurus on Youtube. Starts with the year 1920’s up to 1990’s.  I participated in the 1990’s era and my theme/inspiration in doing the design is Britney Spears.  If I’m ask what for me is the 1990’s? basically it’s britney spears, spice girls and nsync. That’s all i can remember before i went to school. I used to sing songs of her but i stopped when she turned to her sexy image. ^_^ .  I chose britney’s Oops I did it again song for the nail art design. The original song in the video is “oops i did it again” but then I had to chang it since it’s a copyright song :/..

Britney Spears

"Oops, I did it Again"

Materials

Click for more Pictures and Download:

Continue reading

2NE1 CL’s Fading Brown Nail Design

Another KPOP Nail Art for Kpop fans out there!

It’s from 2NE1 Cl’s Etude Photoshoot. I just like the design and how it matches her outfit and her look. I used the fading effect which you can do so yourself. Very quick and easy to make. Enjoy!

CL  (with the nail design) with Dara

2NE1 CL

2ne1 CL

credit as tagged

Materials Used

SUBSCRIBE TO ME ON YOUTUBE

-watch my other nail art video tutorials-

FOLLOW ME ON TWITTER

-know what i’m doing-

ASK ME ON FORMSPRING

-I’ll gladly answer your questions-

LIKE ME ON FACEBOOK

-spread the beauty of nail art-

DOWNLOAD HERE

Password: Sassydarlings

XOXO

3-D in white with Feathers Nail Art Tutorial

Hia everyone!. it’s been a long time since my last post.. Been busy last weekend. Anyways, here’s my nail art entry to Dollface’s 22772 3d Extravaganza Nail Art Contest. This design is for wearable category although a lot of people say that this one fits the extreme category because of the cottons i used. weird huh?, but it’s nice, looks good on your nails and doesn’t come off easily.  Cottons can be a bit messy so i just sprinkle a little amount of water to fit them perfectly on each of my nails.  The yellow feathers are accents that would make the 3d design look more gorgeous.^_^

I hope you too like the design^_^

Materials Used

SUBSCRIBE TO ME ON YOUTUBE

-watch my other nail art video tutorials-

FOLLOW ME ON TWITTER

-know what i’m doing-

ASK ME ON FORMSPRING

-I’ll gladly answer your questions-

LIKE ME ON FACEBOOK

-spread the beauty of nail art-

DOWNLOAD HERE

Password: Sassydarlings

Clubbing Nail Art Tutorial

This design can be worn for wedding, prom or clubbing.^_^ This consists of glitters, a less messy way of applying it unto your nails. Just use the brush to get the glitters instead of dipping your nails to the glitters.^_^
enjoy!

Materials

click for more photos and download

Continue reading

Spring love Nail Art Tutorial

Another Spring Nail Art Tutorial!!. This design was first worn by my sister but only in blue shades. I purposely used different colors for the theme of the contest i entered. enjoy watching!

Materials

SUBSCRIBE TO ME ON YOUTUBE

-watch my other nail art video tutorials-

FOLLOW ME ON TWITTER

-know what i’m doing-

ASK ME ON FORMSPRING

-I’ll gladly answer your questions-

LIKE ME ON FACEBOOK

-spread the beauty of nail art-

DOWNLOAD HERE

Password: sassydarlings

“Colorful Flowers” Nail Art Tutorial

So far this is my favorite nail art tutorial i had made. This is a contest entry to Mame and sadly i didn’t win it.

I got the idea from one of the konad plate designs and just did it with different colors.

Photos:

SUBSCRIBE TO ME ON YOUTUBE

-watch my other nail art video tutorials-

FOLLOW ME ON TWITTER

-know what i’m doing-

ASK ME ON FORMSPRING

-I’ll gladly answer your questions-

LIKE ME ON FACEBOOK

-spread the beauty of nail art-

DOWNLOAD TUTORIAL

password: sassydarlings